> ## Documentation Index
> Fetch the complete documentation index at: https://docs.flexprice.io/llms.txt
> Use this file to discover all available pages before exploring further.
# Build Usage-based Pricing like Vapi.ai
> Vapi is a developer platform for building, testing, and deploying realistic, human-like voice AI agents.
## Overview
Vapi uses a modular, usage-based pricing model where you pay for distinct components.
## Pricing Breakdown
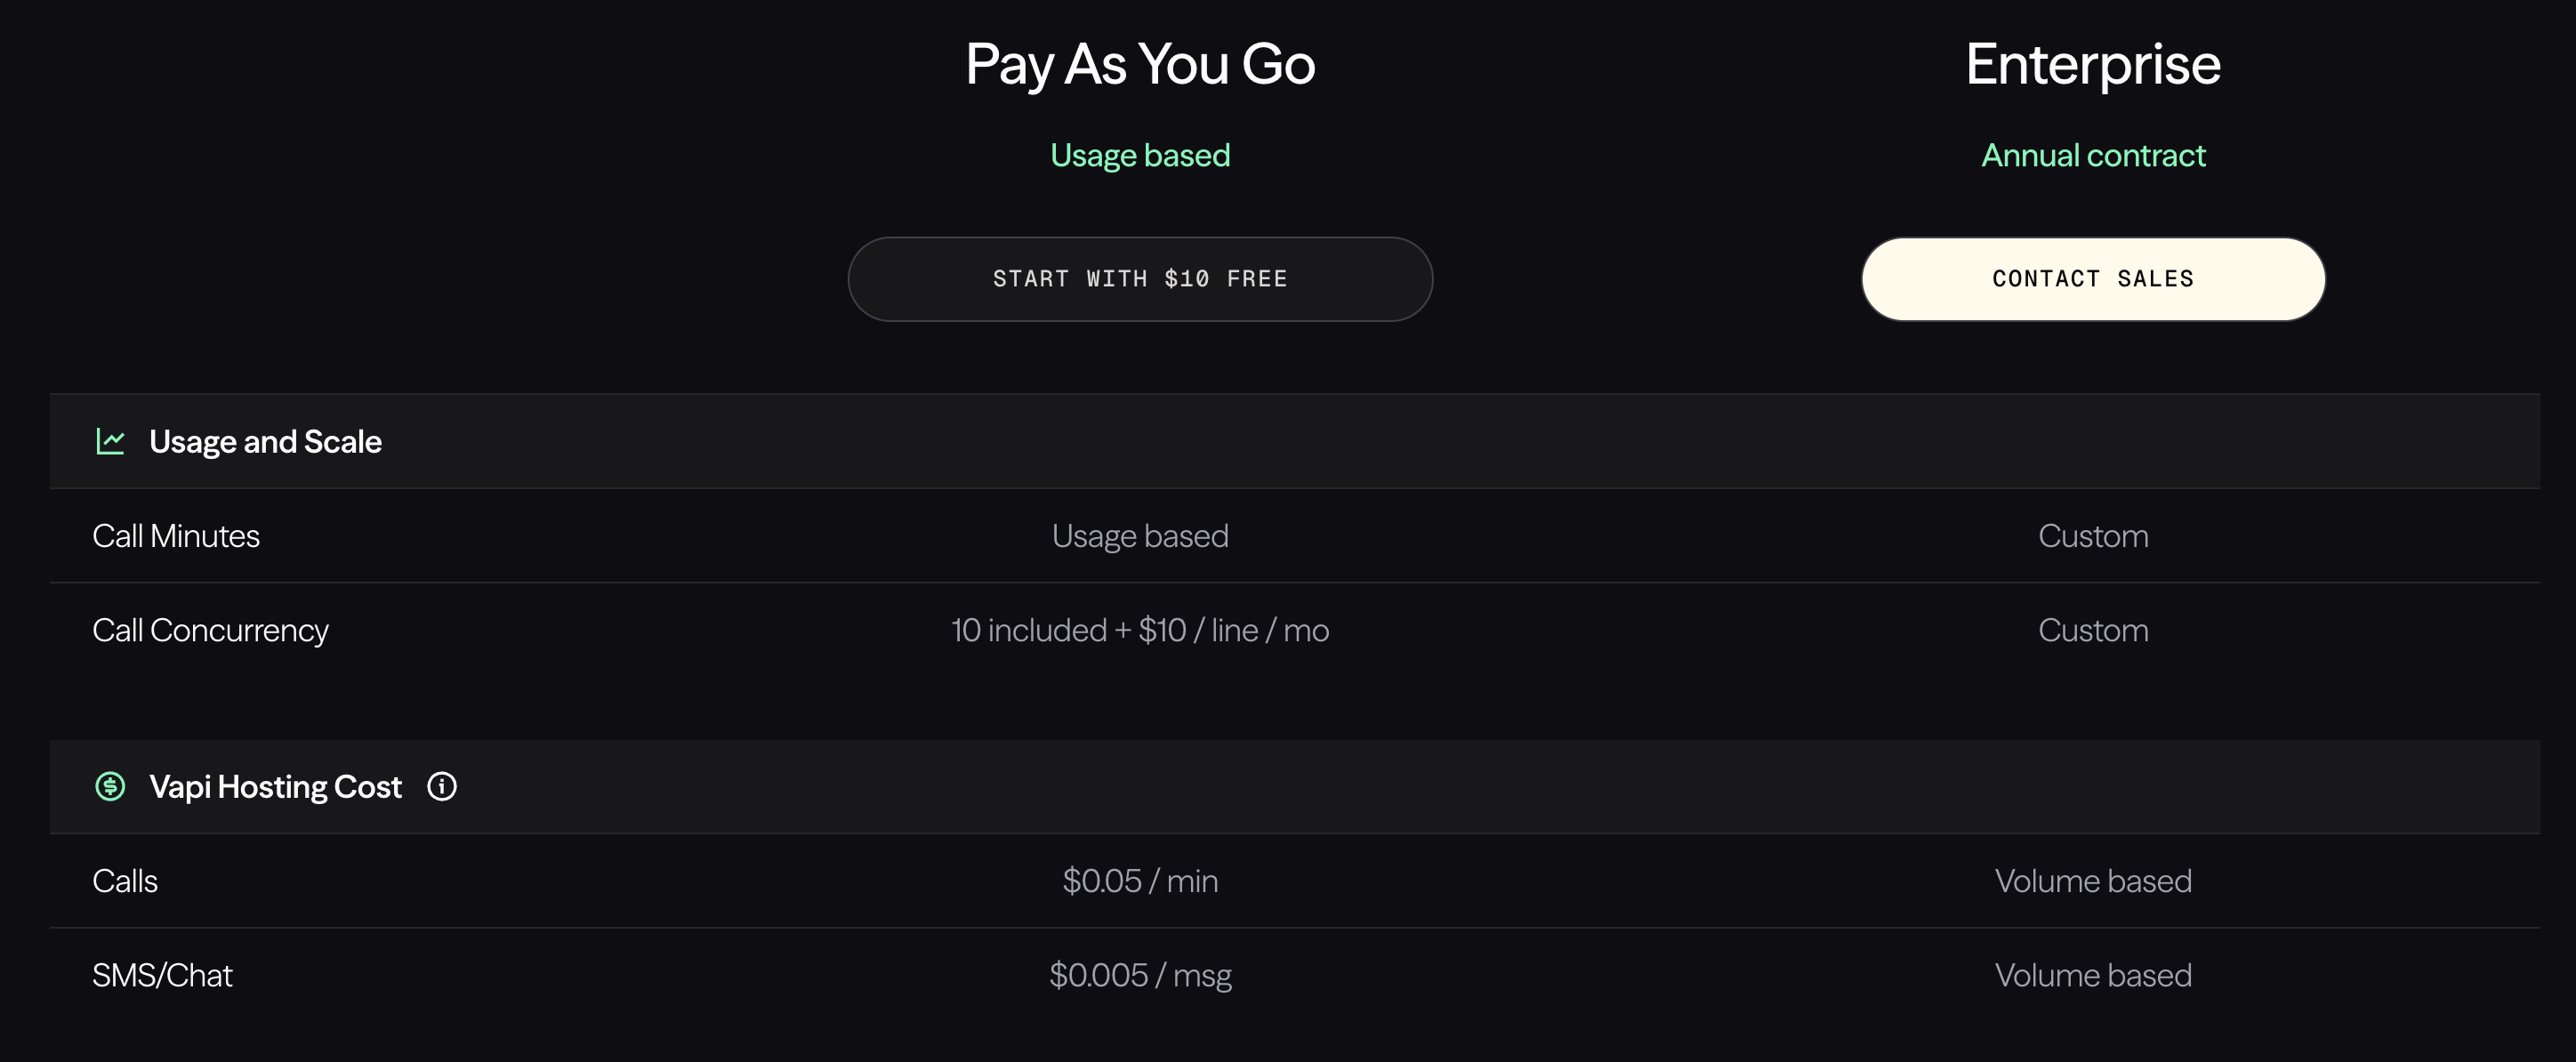 ## 1. Key Chargeable Features in Vapi
* Vapi charges customers primarily for **hosting and orchestration**, not for the underlying AI or telecom providers directly.
### A. Hosting Fee for Call Minutes
It charges a **fixed hosting fee per call minute.**
**Pricing (Pay As You Go):**
* **\$0.05 per minute**
***
### B. Hosting Cost for SMS / Chat Messages
It also charges a **fixed hosting fee per message.**
**Pricing (Pay As You Go):**
* **\$0.005 per message**
***
## 2. Fixed Fees vs Usage-Based Charges
Pricing consists of **fixed per-unit fees**, not bundled plans or feature-based tiers.
### Fixed Fees (Platform Hosting Costs)
These fees are **fixed per unit of usage**:
| Feature | Pricing Model | Cost |
| ------------------ | ------------- | ------------- |
| Call Hosting | Per minute | \$0.05 / min |
| SMS / Chat Hosting | Per message | \$0.005 / msg |
These fees remain the same regardless of scale (Pay As You Go).
***
### Usage-Based Scaling
| Usage Dimension | Pay As You Go | Enterprise |
| ----------------- | --------------------------------- | ------------ |
| Call Minutes | Usage based | Custom |
| SMS / Chat Volume | Usage based | Volume based |
| Call Concurrency | 10 included + \$10 / line / month | Custom |
***
## 3. Call Concurrency Pricing
Call concurrency determines **how many simultaneous calls** your system can handle.
### Pay As You Go
* **10 concurrent calls included**
* **\$10 per additional line per month**
### Enterprise
* Custom concurrency limits
* Volume-based pricing
* SLA-backed infrastructure
***
## 4. Enterprise Pricing Model
The **Enterprise plan** operates under an **annual contract** with custom pricing.
**Enterprise features include:**
* Custom call minute pricing
* Volume-based SMS and chat pricing
* Priority support and SLAs
> Enterprise pricing is negotiated directly with the Vapi sales team.
## Complete Flow Summary
The complete subscription flow for Vapi usage-based pricing:
1. Create Features (Call Minutes, SMS/Chat)
↓
2. Create Plans (Pay As You Go with usage charges)
↓
3. Create Customer (with External ID)
↓
4. Create Subscription (link customer to plan)
↓
5. Send Usage Events (via API)
↓
6. Verify Events (using Event Debugger)
↓
7. Billing (automatic at end of billing cycle)
↓
8. Review Invoices (Customer Info)
## Flexprice Set-up
To configure Vapi's usage-based pricing in Flexprice, follow these steps in order:
Navigate to **Flexprice Dashboard** → **Product Catalog** → **Features**
Click **"Create Feature"** to start creating features. You need to create two metered features:
## 1. Key Chargeable Features in Vapi
* Vapi charges customers primarily for **hosting and orchestration**, not for the underlying AI or telecom providers directly.
### A. Hosting Fee for Call Minutes
It charges a **fixed hosting fee per call minute.**
**Pricing (Pay As You Go):**
* **\$0.05 per minute**
***
### B. Hosting Cost for SMS / Chat Messages
It also charges a **fixed hosting fee per message.**
**Pricing (Pay As You Go):**
* **\$0.005 per message**
***
## 2. Fixed Fees vs Usage-Based Charges
Pricing consists of **fixed per-unit fees**, not bundled plans or feature-based tiers.
### Fixed Fees (Platform Hosting Costs)
These fees are **fixed per unit of usage**:
| Feature | Pricing Model | Cost |
| ------------------ | ------------- | ------------- |
| Call Hosting | Per minute | \$0.05 / min |
| SMS / Chat Hosting | Per message | \$0.005 / msg |
These fees remain the same regardless of scale (Pay As You Go).
***
### Usage-Based Scaling
| Usage Dimension | Pay As You Go | Enterprise |
| ----------------- | --------------------------------- | ------------ |
| Call Minutes | Usage based | Custom |
| SMS / Chat Volume | Usage based | Volume based |
| Call Concurrency | 10 included + \$10 / line / month | Custom |
***
## 3. Call Concurrency Pricing
Call concurrency determines **how many simultaneous calls** your system can handle.
### Pay As You Go
* **10 concurrent calls included**
* **\$10 per additional line per month**
### Enterprise
* Custom concurrency limits
* Volume-based pricing
* SLA-backed infrastructure
***
## 4. Enterprise Pricing Model
The **Enterprise plan** operates under an **annual contract** with custom pricing.
**Enterprise features include:**
* Custom call minute pricing
* Volume-based SMS and chat pricing
* Priority support and SLAs
> Enterprise pricing is negotiated directly with the Vapi sales team.
## Complete Flow Summary
The complete subscription flow for Vapi usage-based pricing:
1. Create Features (Call Minutes, SMS/Chat)
↓
2. Create Plans (Pay As You Go with usage charges)
↓
3. Create Customer (with External ID)
↓
4. Create Subscription (link customer to plan)
↓
5. Send Usage Events (via API)
↓
6. Verify Events (using Event Debugger)
↓
7. Billing (automatic at end of billing cycle)
↓
8. Review Invoices (Customer Info)
## Flexprice Set-up
To configure Vapi's usage-based pricing in Flexprice, follow these steps in order:
Navigate to **Flexprice Dashboard** → **Product Catalog** → **Features**
Click **"Create Feature"** to start creating features. You need to create two metered features:
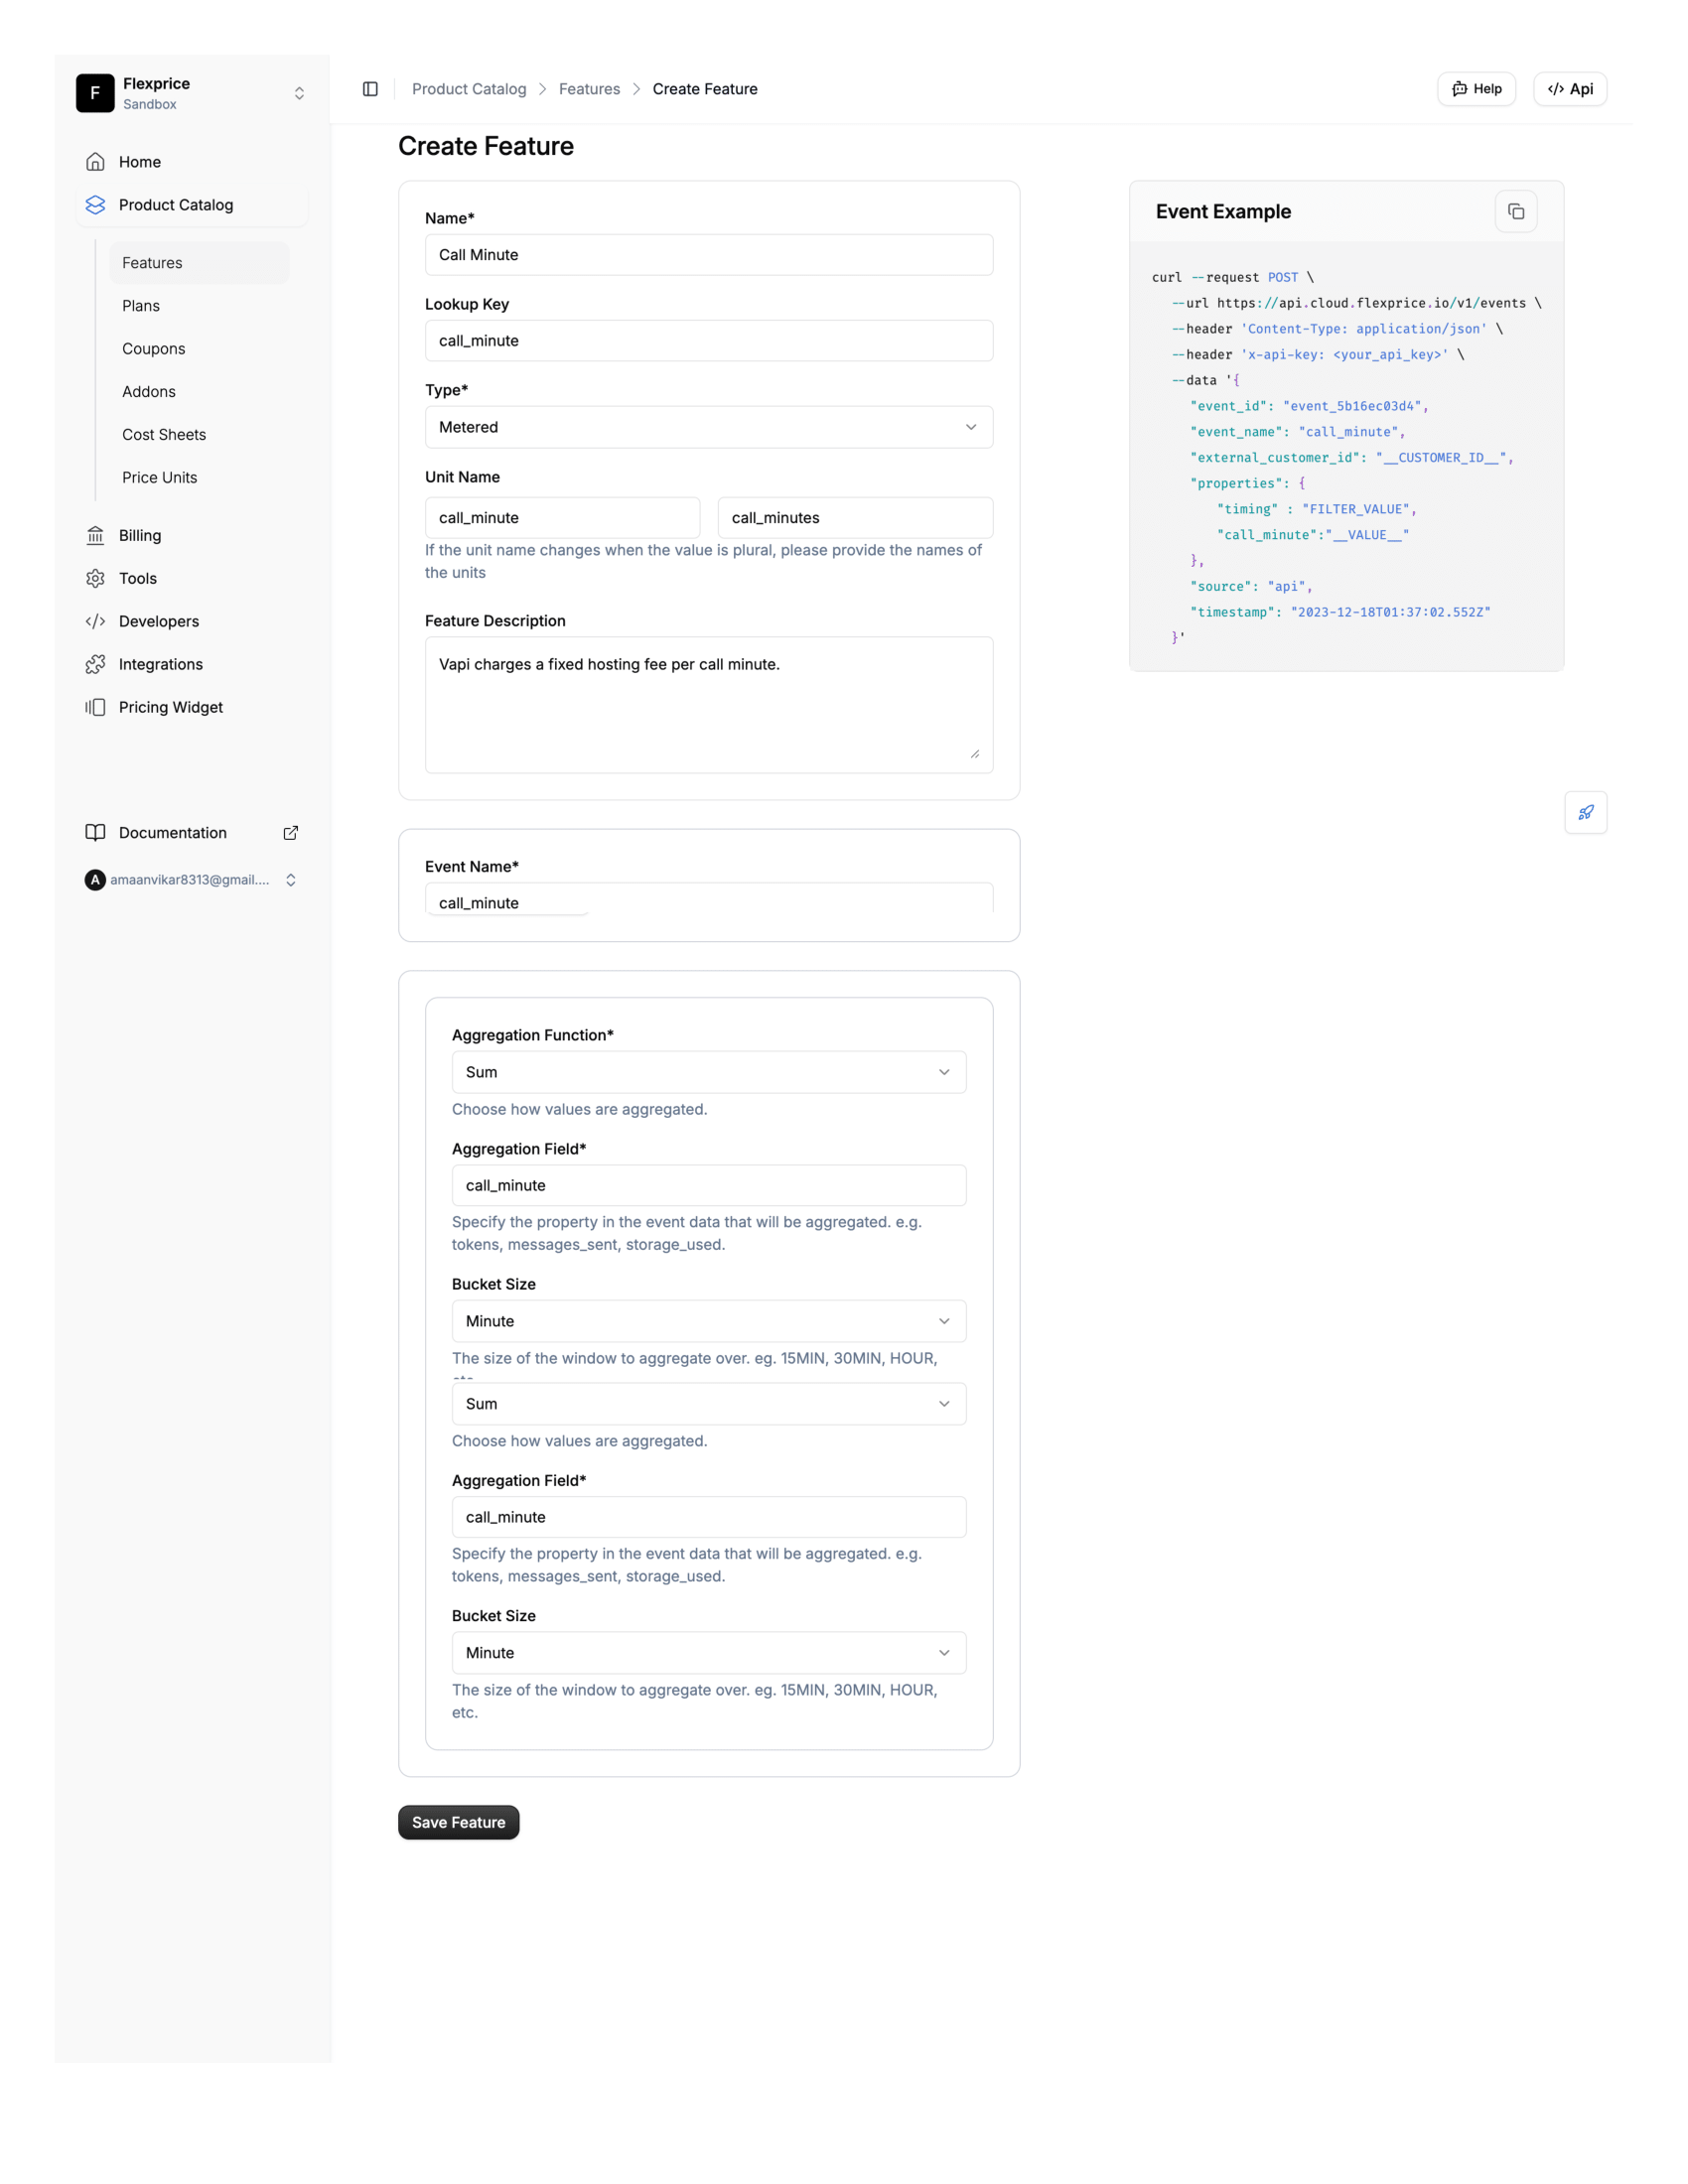 **Feature 1: SMS / Chat Hosting**
* **Feature Name**: `SMS / Chat Hosting`
* **Feature Lookup\_key**: `sms_chat_hosting` (immutable, unique identifier)
* **Feature Type**: `Metered`
* **Event Name**: `sms.chat.message` (must match exactly when sending events)
* **Aggregation Method**: `Sum`
* **Aggregation Field**: `messages`
* **Unit**: `message` or `msg`
* **Description**: `Vapi hosting cost for SMS and chat messages - covers message delivery, session handling, and conversational state management`
> **Note**: The Event Name must match exactly when you send usage events via API. Save these event names for later use.
For comprehensive information on creating features, see [Features](/docs/product-catalogue/features/create).
Navigate to **Flexprice Dashboard** → **Product Catalog** → **Plans**
Click **"Add"** at the top-right to create a new plan.
**Create Pay As You Go Plan:**
**Feature 1: SMS / Chat Hosting**
* **Feature Name**: `SMS / Chat Hosting`
* **Feature Lookup\_key**: `sms_chat_hosting` (immutable, unique identifier)
* **Feature Type**: `Metered`
* **Event Name**: `sms.chat.message` (must match exactly when sending events)
* **Aggregation Method**: `Sum`
* **Aggregation Field**: `messages`
* **Unit**: `message` or `msg`
* **Description**: `Vapi hosting cost for SMS and chat messages - covers message delivery, session handling, and conversational state management`
> **Note**: The Event Name must match exactly when you send usage events via API. Save these event names for later use.
For comprehensive information on creating features, see [Features](/docs/product-catalogue/features/create).
Navigate to **Flexprice Dashboard** → **Product Catalog** → **Plans**
Click **"Add"** at the top-right to create a new plan.
**Create Pay As You Go Plan:**
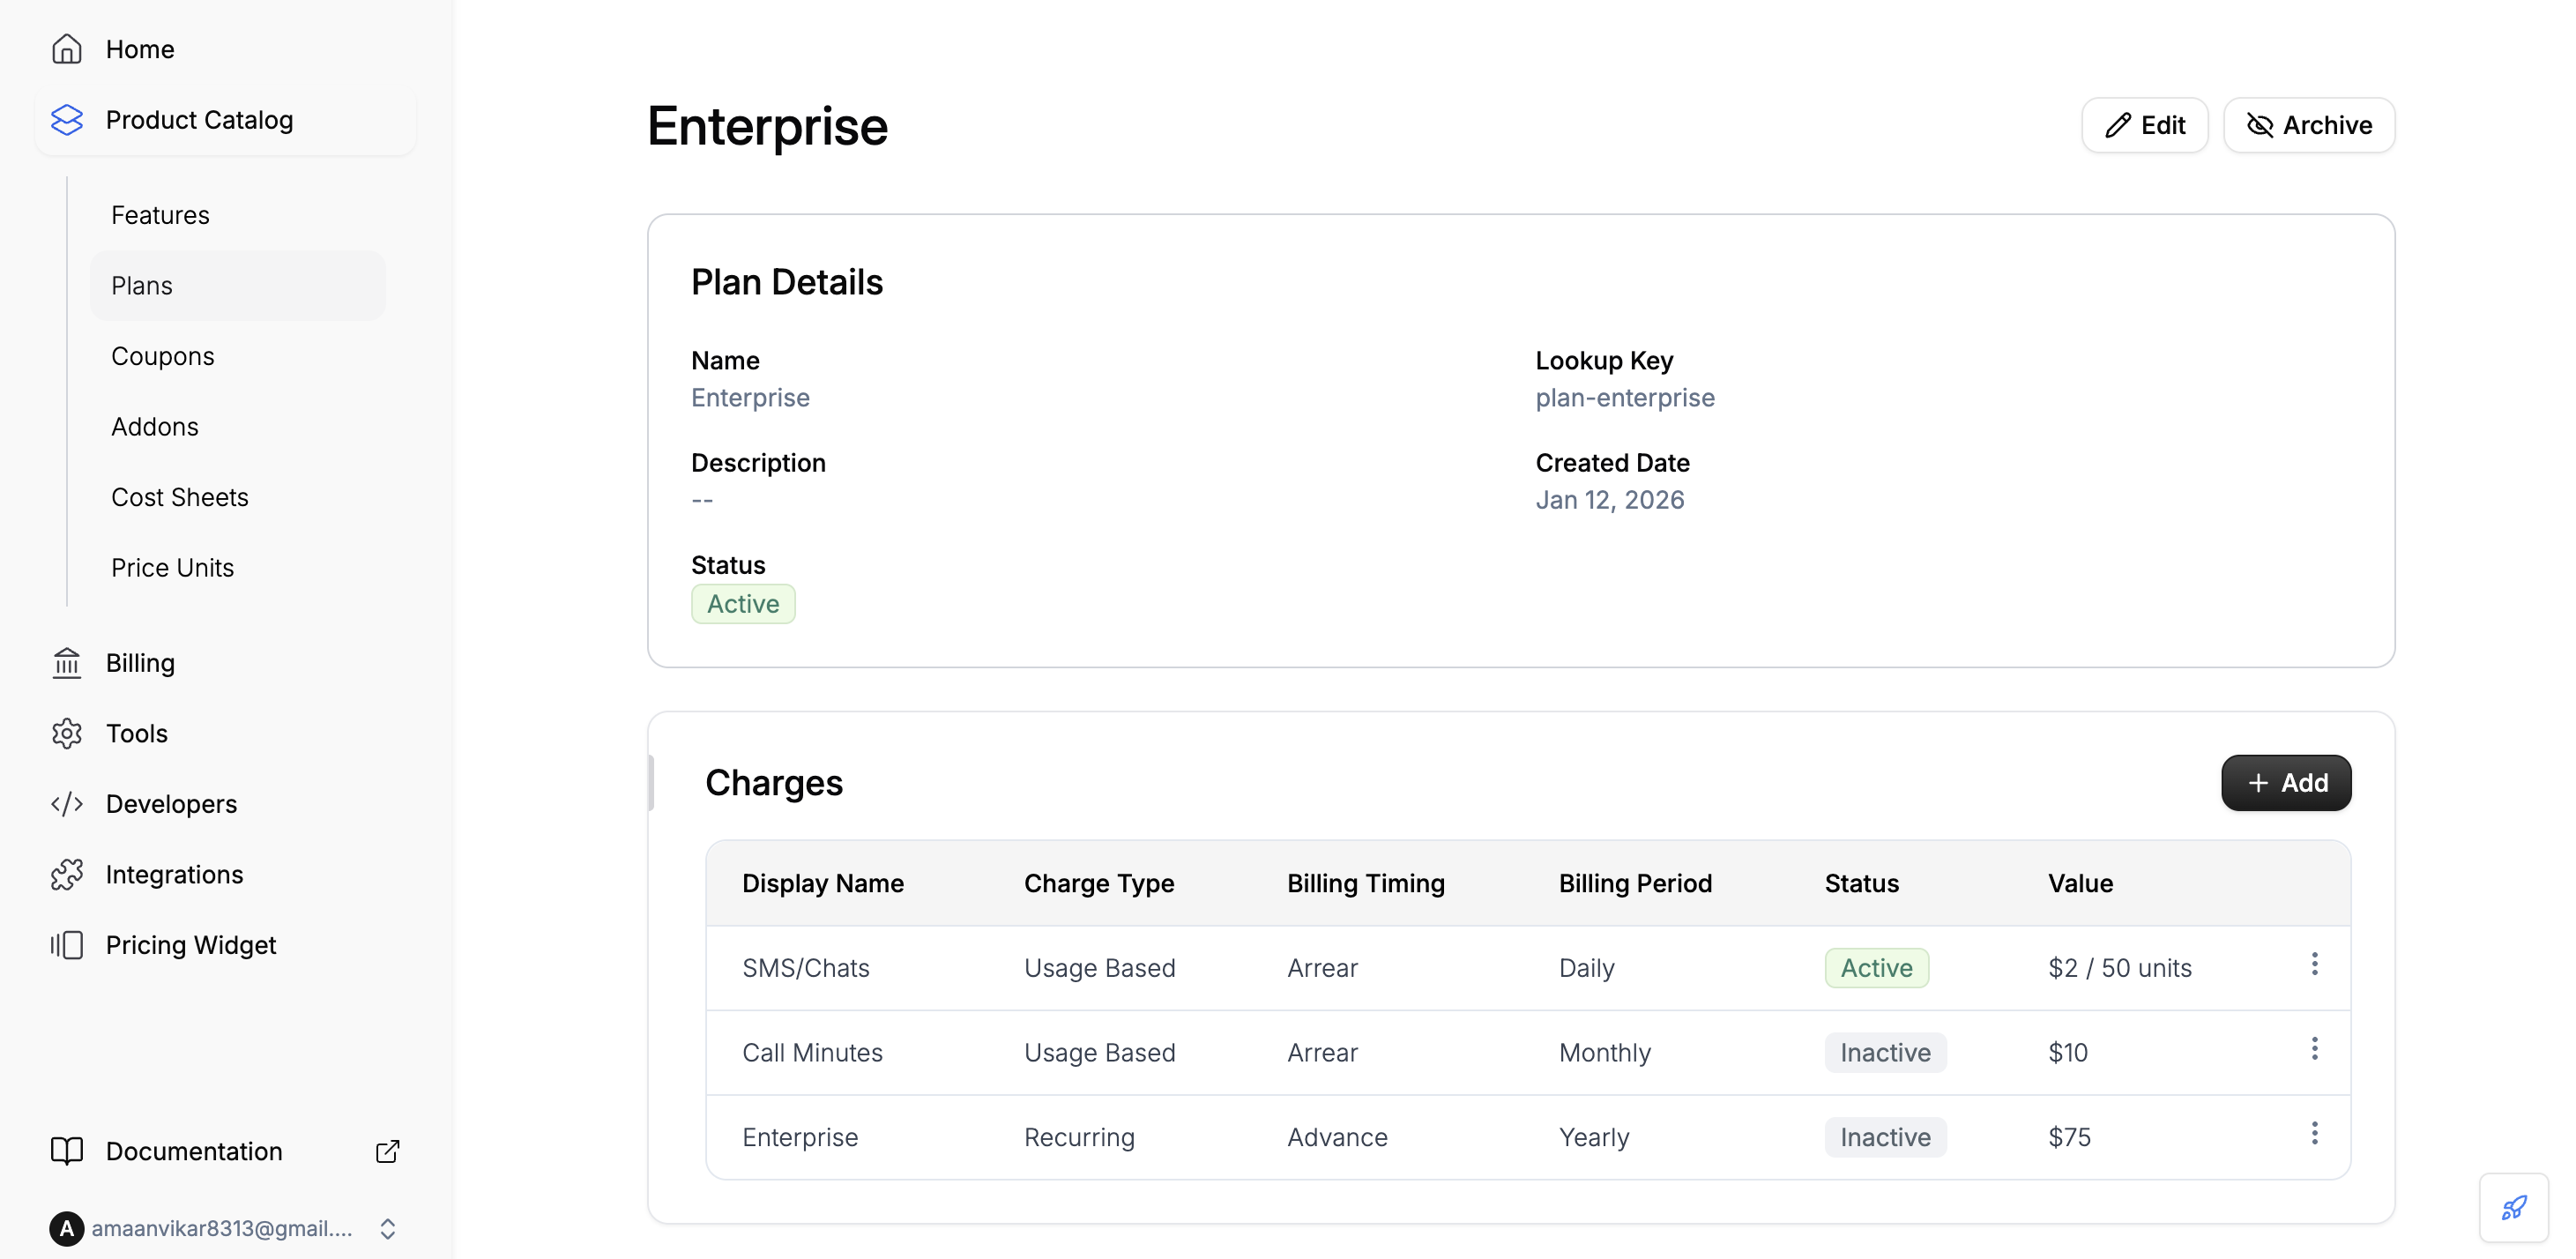 **Step 2.1: Plan Details**
* **Plan Name**: `Pay As You Go`
* **Lookup Key**: `pay_as_you_go` (immutable, unique identifier)
* **Plan Description**: `Usage-based pricing plan with flat fees for call minutes and SMS/chat messages`
* Click **Next** to proceed to charge configuration
**Step 2.2: Define Usage-Based Charges**
**Charge 1: SMS / Chat Hosting**
* **Select Metered Feature**: `SMS / Chat Hosting` (sms\_chat\_hosting)
* **Billing Currency**: `USD`
* **Billing Period**: `Monthly`
* **Billing Model**: `Flat Fee`
* **Price per Unit**: `0.005` (per message)
* **Billing Timing**: `Arrears Billing` (bill at end of cycle)
* Click **Add** to save this charge
Click **Save** to finalize the Pay As You Go plan.
For comprehensive information on creating plans, see [Creating a Plan](/docs/product-catalogue/plans/create).
Navigate to **Flexprice Dashboard** → **Customer Management** → **Customers**
Click **"Add Customer"** to create a new customer.
**Required Fields:**
* **Customer Name**: `Acme Corporation` (or your customer's name)
* **External ID**: `cust_acme_001` (unique identifier from your system)
**Optional Fields:**
* **Email**: Customer's email address
* **Phone**: Customer's phone number
* **Address**: Customer's billing address
> **Important**: The External ID is what you'll use when sending usage events. Make sure it matches exactly.
Click **Save** to create the customer.
For comprehensive information on creating customers, see [Customer Management](/docs/customers/create).
Navigate to **Flexprice Dashboard** → **Customer Management** → **Customers**
Click on the customer you created to open their details page.
Click **"Add Subscription"** button.
**Subscription Configuration:**
* **Select Plan**: Choose `Pay As You Go` from the dropdown
* **Subscription Start Date**: Select the start date for billing (e.g., today's date)
* **Subscription End Date**: Leave as "Forever" for ongoing subscriptions, or set a specific end date
* **Billing Cycle**: This determines when billing cycles start (usually the start date)
The subscription preview will show:
* All recurring charges (if any)
* Usage-based charges that will be billed based on consumption
* Estimated costs for the billing period
Click **Add Subscription** to save.
The subscription will now appear under the customer's details with status "Active".
For comprehensive information on creating subscriptions, see [Create Subscription](/docs/subscriptions/customers-create-subscription).
Once a customer has an active subscription, you can start sending usage events to Flexprice via API.
**API Endpoint:**
```
POST https://api.cloud.flexprice.io/v1/events
```
**Authentication:**
Include your API key in the request header:
```
x-api-key:
```
**Example 1: Send SMS/Chat Message Event**
```bash theme={null}
curl --request POST \
--url https://api.cloud.flexprice.io/v1/events \
--header 'Content-Type: application/json' \
--header 'x-api-key: ' \
--data '{
"event_name": "sms.chat.message",
"external_customer_id": "cust_acme_001",
"properties": {
"messages": 1
},
"event_id": "evt_sms_67890",
"timestamp": "2025-01-15T10:35:00.000Z",
"source": "vapi-platform"
}'
```
**Example 2: Bulk Events (Multiple Events at Once)**
```bash theme={null}
curl --request POST \
--url https://api.cloud.flexprice.io/v1/events/bulk \
--header 'Content-Type: application/json' \
--header 'x-api-key: ' \
--data '{
"events": [
{
"event_name": "call.minutes",
"external_customer_id": "cust_acme_001",
"properties": { "minutes": 10 },
"source": "vapi-platform"
},
{
"event_name": "sms.chat.message",
"external_customer_id": "cust_acme_001",
"properties": { "messages": 3 },
"source": "vapi-platform"
}
]
}'
```
**Event Payload Fields:**
* **event\_name** (required): Must match your feature's Event Name exactly (`call.minutes` or `sms.chat.message`)
* **external\_customer\_id** (required): Must match the customer's External ID (`cust_acme_001`)
* **properties** (required): Contains the aggregation field value
* For Call Minutes: `{"minutes": }`
* For SMS/Chat: `{"messages": }`
* **event\_id** (optional): Your unique identifier for the event
* **timestamp** (optional): ISO 8601 UTC timestamp. If omitted, server time is used
* **source** (optional): Origin of the event (e.g., "vapi-platform", "api")
**Response:**
```json theme={null}
{
"event_id": "event_01K389J4M1F1NZG6XP0AMD6J52",
"message": "Event accepted for processing"
}
```
For comprehensive information on sending events, see [Sending Events](/docs/event-ingestion/sending-events).
After sending usage events, verify they are being processed correctly using the Event Debugger.
**Navigate to Event Debugger:**
1. Go to **Flexprice Dashboard** → **Usage Tracking** → **Event Debugger**
**View Events:**
The Event Debugger displays a real-time stream of events with:
* **Event ID**: Unique identifier for each event
* **Event Name**: The feature being tracked (`call.minutes` or `sms.chat.message`)
* **Customer Lookup Key**: Customer's External ID
* **Source**: Origin of the event
* **Timestamp**: When the event occurred
**View Event Details:**
Click on any event to view the complete payload:
```json theme={null}
{
"id": "event_01",
"external_customer_id": "cust_acme_001",
"event_name": "call.minutes",
"timestamp": "2025-01-15T10:30:00.000Z",
"properties": {
"minutes": 5.5
},
"source": "vapi-platform"
}
```
**Filter Events:**
Use filters to find specific events:
* **Filter by Event Name**: `event_name contains "call.minutes"`
* **Filter by Customer**: `external_customer_id contains "cust_acme_001"`
* **Filter by Time Range**: Set Start Time and End Time
* **Filter by Source**: `source contains "vapi-platform"`
**Verify Event Processing:**
1. Check that events appear in the Event Debugger shortly after sending
2. Verify the event payload matches what you sent
3. Confirm the `external_customer_id` matches your customer
4. Ensure `event_name` matches your feature configuration exactly
5. Check that `properties` contain the correct aggregation field values
For comprehensive information on event debugging, see [Event Debugger](/docs/event-ingestion/event-debugger) and [Validating Events](/docs/event-ingestion/validating-events).
## Next Steps
After completing the setup:
1. **Monitor Usage**: Regularly check the Event Debugger to ensure events are being processed
2. **Review Invoices**: Check upcoming invoices to verify billing calculations
3. **Track Usage**: Use the Query tool to view aggregated usage by customer and feature
4. **Scale**: Add more customers and subscriptions as your business grows
For troubleshooting, see [Troubleshooting Events](/docs/event-ingestion/troubleshooting).
**Step 2.1: Plan Details**
* **Plan Name**: `Pay As You Go`
* **Lookup Key**: `pay_as_you_go` (immutable, unique identifier)
* **Plan Description**: `Usage-based pricing plan with flat fees for call minutes and SMS/chat messages`
* Click **Next** to proceed to charge configuration
**Step 2.2: Define Usage-Based Charges**
**Charge 1: SMS / Chat Hosting**
* **Select Metered Feature**: `SMS / Chat Hosting` (sms\_chat\_hosting)
* **Billing Currency**: `USD`
* **Billing Period**: `Monthly`
* **Billing Model**: `Flat Fee`
* **Price per Unit**: `0.005` (per message)
* **Billing Timing**: `Arrears Billing` (bill at end of cycle)
* Click **Add** to save this charge
Click **Save** to finalize the Pay As You Go plan.
For comprehensive information on creating plans, see [Creating a Plan](/docs/product-catalogue/plans/create).
Navigate to **Flexprice Dashboard** → **Customer Management** → **Customers**
Click **"Add Customer"** to create a new customer.
**Required Fields:**
* **Customer Name**: `Acme Corporation` (or your customer's name)
* **External ID**: `cust_acme_001` (unique identifier from your system)
**Optional Fields:**
* **Email**: Customer's email address
* **Phone**: Customer's phone number
* **Address**: Customer's billing address
> **Important**: The External ID is what you'll use when sending usage events. Make sure it matches exactly.
Click **Save** to create the customer.
For comprehensive information on creating customers, see [Customer Management](/docs/customers/create).
Navigate to **Flexprice Dashboard** → **Customer Management** → **Customers**
Click on the customer you created to open their details page.
Click **"Add Subscription"** button.
**Subscription Configuration:**
* **Select Plan**: Choose `Pay As You Go` from the dropdown
* **Subscription Start Date**: Select the start date for billing (e.g., today's date)
* **Subscription End Date**: Leave as "Forever" for ongoing subscriptions, or set a specific end date
* **Billing Cycle**: This determines when billing cycles start (usually the start date)
The subscription preview will show:
* All recurring charges (if any)
* Usage-based charges that will be billed based on consumption
* Estimated costs for the billing period
Click **Add Subscription** to save.
The subscription will now appear under the customer's details with status "Active".
For comprehensive information on creating subscriptions, see [Create Subscription](/docs/subscriptions/customers-create-subscription).
Once a customer has an active subscription, you can start sending usage events to Flexprice via API.
**API Endpoint:**
```
POST https://api.cloud.flexprice.io/v1/events
```
**Authentication:**
Include your API key in the request header:
```
x-api-key:
```
**Example 1: Send SMS/Chat Message Event**
```bash theme={null}
curl --request POST \
--url https://api.cloud.flexprice.io/v1/events \
--header 'Content-Type: application/json' \
--header 'x-api-key: ' \
--data '{
"event_name": "sms.chat.message",
"external_customer_id": "cust_acme_001",
"properties": {
"messages": 1
},
"event_id": "evt_sms_67890",
"timestamp": "2025-01-15T10:35:00.000Z",
"source": "vapi-platform"
}'
```
**Example 2: Bulk Events (Multiple Events at Once)**
```bash theme={null}
curl --request POST \
--url https://api.cloud.flexprice.io/v1/events/bulk \
--header 'Content-Type: application/json' \
--header 'x-api-key: ' \
--data '{
"events": [
{
"event_name": "call.minutes",
"external_customer_id": "cust_acme_001",
"properties": { "minutes": 10 },
"source": "vapi-platform"
},
{
"event_name": "sms.chat.message",
"external_customer_id": "cust_acme_001",
"properties": { "messages": 3 },
"source": "vapi-platform"
}
]
}'
```
**Event Payload Fields:**
* **event\_name** (required): Must match your feature's Event Name exactly (`call.minutes` or `sms.chat.message`)
* **external\_customer\_id** (required): Must match the customer's External ID (`cust_acme_001`)
* **properties** (required): Contains the aggregation field value
* For Call Minutes: `{"minutes": }`
* For SMS/Chat: `{"messages": }`
* **event\_id** (optional): Your unique identifier for the event
* **timestamp** (optional): ISO 8601 UTC timestamp. If omitted, server time is used
* **source** (optional): Origin of the event (e.g., "vapi-platform", "api")
**Response:**
```json theme={null}
{
"event_id": "event_01K389J4M1F1NZG6XP0AMD6J52",
"message": "Event accepted for processing"
}
```
For comprehensive information on sending events, see [Sending Events](/docs/event-ingestion/sending-events).
After sending usage events, verify they are being processed correctly using the Event Debugger.
**Navigate to Event Debugger:**
1. Go to **Flexprice Dashboard** → **Usage Tracking** → **Event Debugger**
**View Events:**
The Event Debugger displays a real-time stream of events with:
* **Event ID**: Unique identifier for each event
* **Event Name**: The feature being tracked (`call.minutes` or `sms.chat.message`)
* **Customer Lookup Key**: Customer's External ID
* **Source**: Origin of the event
* **Timestamp**: When the event occurred
**View Event Details:**
Click on any event to view the complete payload:
```json theme={null}
{
"id": "event_01",
"external_customer_id": "cust_acme_001",
"event_name": "call.minutes",
"timestamp": "2025-01-15T10:30:00.000Z",
"properties": {
"minutes": 5.5
},
"source": "vapi-platform"
}
```
**Filter Events:**
Use filters to find specific events:
* **Filter by Event Name**: `event_name contains "call.minutes"`
* **Filter by Customer**: `external_customer_id contains "cust_acme_001"`
* **Filter by Time Range**: Set Start Time and End Time
* **Filter by Source**: `source contains "vapi-platform"`
**Verify Event Processing:**
1. Check that events appear in the Event Debugger shortly after sending
2. Verify the event payload matches what you sent
3. Confirm the `external_customer_id` matches your customer
4. Ensure `event_name` matches your feature configuration exactly
5. Check that `properties` contain the correct aggregation field values
For comprehensive information on event debugging, see [Event Debugger](/docs/event-ingestion/event-debugger) and [Validating Events](/docs/event-ingestion/validating-events).
## Next Steps
After completing the setup:
1. **Monitor Usage**: Regularly check the Event Debugger to ensure events are being processed
2. **Review Invoices**: Check upcoming invoices to verify billing calculations
3. **Track Usage**: Use the Query tool to view aggregated usage by customer and feature
4. **Scale**: Add more customers and subscriptions as your business grows
For troubleshooting, see [Troubleshooting Events](/docs/event-ingestion/troubleshooting).